前言
本博客只是记录一下本人在深度学习过程中的学习笔记和编程经验,大部分代码是参考了【中文】【吴恩达课后编程作业】Course 5 - 序列模型 - 第二周作业 - 词向量的运算与Emoji生成器这篇博客,对其代码实现了复现,但是原博客中代码使用的是tensorflow,而我在学习中主要用到的是pytorch,所以此次作业我使用pytorch框架来完成。代码或文字表述中还存在一些问题,请见谅,之前的博客也是主要参考这个大佬。下文中的完整代码已经上传到百度网盘中,提取码:00cz。
所以开始作业前,请大家安装好pytorch的环境,我代码是在服务器上利用gpu加速运行的,但是cpu版本的pytorch也能运行,只是速度会比较慢。
一、词向量运算
1.数据准备
训练得到词嵌入数据是需要消耗庞大的资源,这里我们就用已经训练好的glove词向量代替。
读取glove英文词向量:
def read_glove_vecs(glove_file):
    """
    加载glove英文词向量
    :param glove_file: 文件路径
    :return:
    """
    with open(glove_file, 'r', encoding="utf-8") as f:
        words = set()
        word_to_vec_map = {}

        for line in f:
            line = line.strip().split()
            curr_word = line[0]
            words.add(curr_word)
            word_to_vec_map[curr_word] = np.array(line[1:], dtype=np.float64)
    return words, word_to_vec_map
words:列表类型数据,记录了词典中的全部词
word_to_vec_map:字典类型,构造"词-词向量"键值对,可以方便的查找指定词的词向量查看英文词向量:
words, word_to_vec_map = w2v_utils_pytorch.read_glove_vecs('data/glove.6B.50d.txt')
print(word_to_vec_map["hello"])
[-0.38497 0.80092 0.064106 -0.28355 -0.026759 -0.34532 -0.64253
-0.11729 -0.33257 0.55243 -0.087813 0.9035 0.47102 0.56657
0.6985 -0.35229 -0.86542 0.90573 0.03576 -0.071705 -0.12327
0.54923 0.47005 0.35572 1.2611 -0.67581 -0.94983 0.68666
0.3871 -1.3492 0.63512 0.46416 -0.48814 0.83827 -0.9246
-0.33722 0.53741 -1.0616 -0.081403 -0.67111 0.30923 -0.3923
-0.55002 -0.68827 0.58049 -0.11626 0.013139 -0.57654 0.048833
0.67204 ]glove中包含了40000个英文单词的词向量,每个词向量的维度是50维。在了解数据的基本情况后,可以运用这些词向量做一些简单的计算了。
2.余弦相似度
根据余弦相似度的计算公式可以编程计算两个词的相似度情况,不清楚余弦相似度的可以自行百度:
def cosine_similarity(u, v):
    """
    计算两个词向量的余弦相似度
    :param u:单词u的词向量
    :param v:单词v的词向量
    :return:
    """
    dot = np.dot(u, v)
    norm_u = np.sqrt(np.sum(np.power(u, 2)))
    norm_v = np.sqrt(np.sum(np.power(v, 2)))

    distance = np.divide(dot, norm_v * norm_u)

    return distance
简单计算一些词的余弦相似度:
words, word_to_vec_map = w2v_utils_pytorch.read_glove_vecs('data/glove.6B.50d.txt')

father = word_to_vec_map["father"]
mother = word_to_vec_map["mother"]
ball = word_to_vec_map["ball"]
crocodile = word_to_vec_map["crocodile"]
france = word_to_vec_map["france"]
italy = word_to_vec_map["italy"]
paris = word_to_vec_map["paris"]
rome = word_to_vec_map["rome"]

print("cosine_similarity(father, mother) = ", w2v_utils_pytorch.cosine_similarity(father, mother))
print("cosine_similarity(ball, crocodile) = ",w2v_utils_pytorch.cosine_similarity(ball, crocodile))
print("cosine_similarity(france - paris, rome - italy) = ",w2v_utils_pytorch.cosine_similarity(france - paris, rome - italy))
cosine_similarity(father, mother) = 0.8909038442893616
cosine_similarity(ball, crocodile) = 0.27439246261379424
cosine_similarity(france - paris, rome - italy) = -0.6751479308174201可以看出约相似的词,其词向量在空间中的夹角越小,计算得到的余弦相似度就越大,这也说明了glove词向量的质量比较优秀。
3.词类类比
当我们拥有优秀的词向量后可以完成词类类比任务:“A与B相比就类似于C与____相比一样”,比如:“男人与女人相比就像国王与 女皇 相比”。具体原理就是在词典中找到一个词D,使得vector(B)-vector(A) $\approx$ vector(D)-vector(C),依旧采用余弦公式计算两者的相似度。
def complete_analogy(word_a, word_b, word_c, word_to_vec_map):
    """
    词类比问题:解决“A与B相比就类似于C与____相比一样”问题,比如“男人与女人相比就像国王与 女皇 相比一样”
    其实就是在词库里面找到一个词word_d满足:word_b - word-a 与 word_d - word_c 近似相等
    :param word_a:词a
    :param word_b:词b
    :param word_c:词c
    :param word_to_vec_map:词典
    :return:
    """
    # 将单词转换为小写
    word_a, word_b, word_c = word_a.lower(), word_b.lower(), word_c.lower()

    # 找到单词的词向量
    e_a, e_b, e_c = word_to_vec_map[word_a], word_to_vec_map[word_b], word_to_vec_map[word_c]

    words = word_to_vec_map.keys()

    max_cosine_similarity = -100
    best_word = None

    # 遍历整个词典
    for word in words:
        if word in [word_a, word_b, word_c]:
            continue
        cosine_sim = cosine_similarity((e_b - e_a), (word_to_vec_map[word] - e_c))

        if cosine_sim > max_cosine_similarity:
            max_cosine_similarity = cosine_sim
            best_word = word

    return best_word
简单测试一下:
triads_to_try = [('italy', 'italian', 'spain'), ('india', 'delhi', 'japan'), ('man', 'woman', 'boy'), ('small', 'smaller', 'large')]
for triad in triads_to_try:
    print('{} -> {} <====> {} -> {}'.format(*triad, w2v_utils_pytorch.complete_analogy(*triad, word_to_vec_map)))
italy -> italian <====> spain -> spanish
india -> delhi <====> japan -> tokyo
man -> woman <====> boy -> girl
small -> smaller <====> large -> larger 可以看出,glove词向量处理词类类比任务时效果还是非常好的。
原作业中提到了去除词向量中的偏见属于选学部分,本人还未完全理解,感兴趣的同学可以参考我前言中原博客中的内容。
二、表情生成器V1
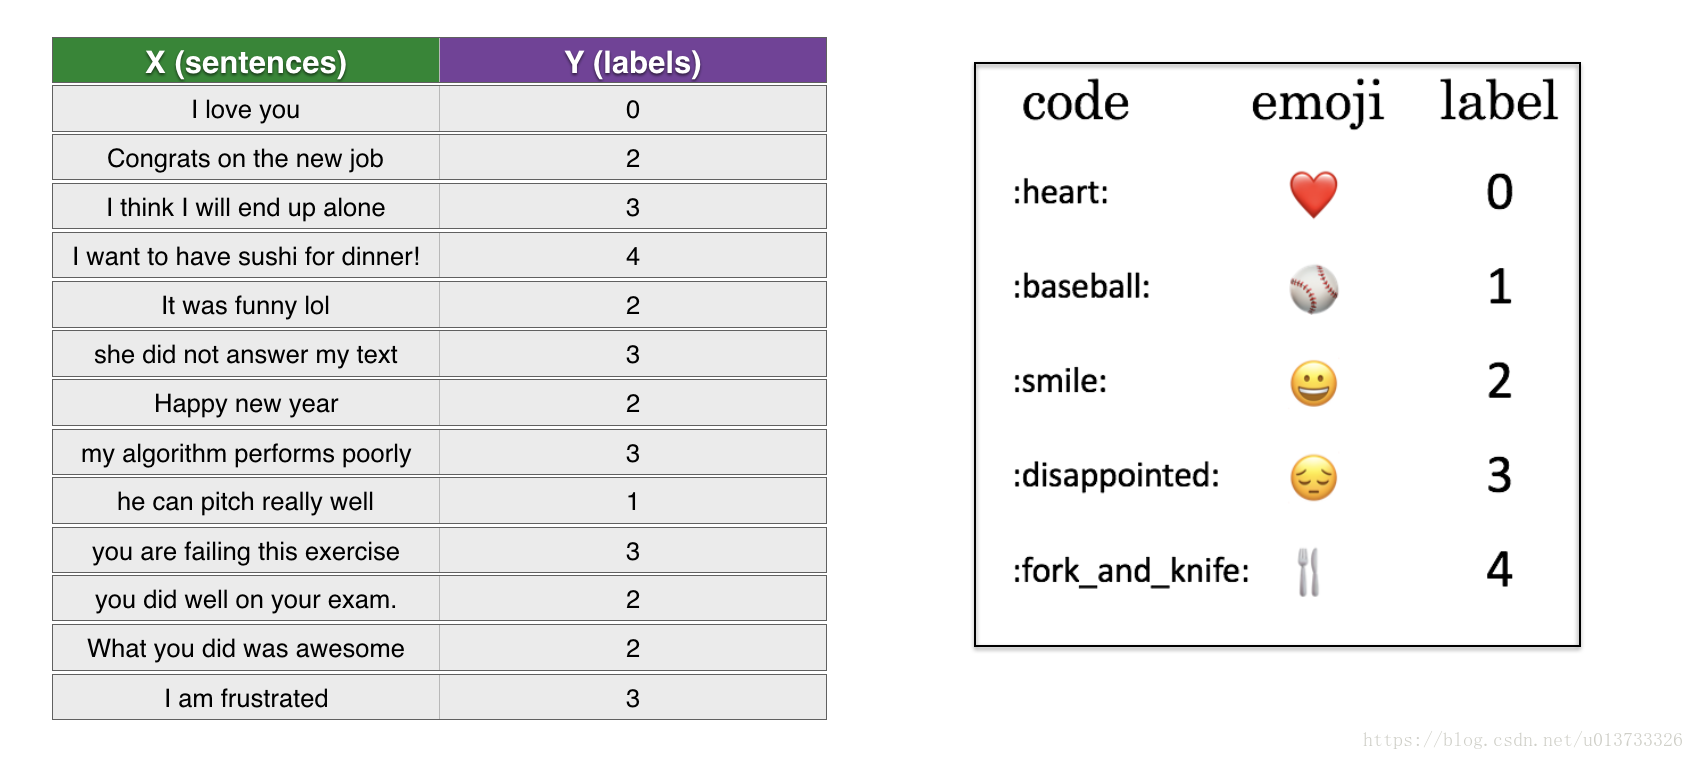
表情生成器其实就是情感分类,本质上是多分类问题。在原作业中想要打印表情符号需要安装emoji包,这里我简化一下问题,只针对情感分类任务。

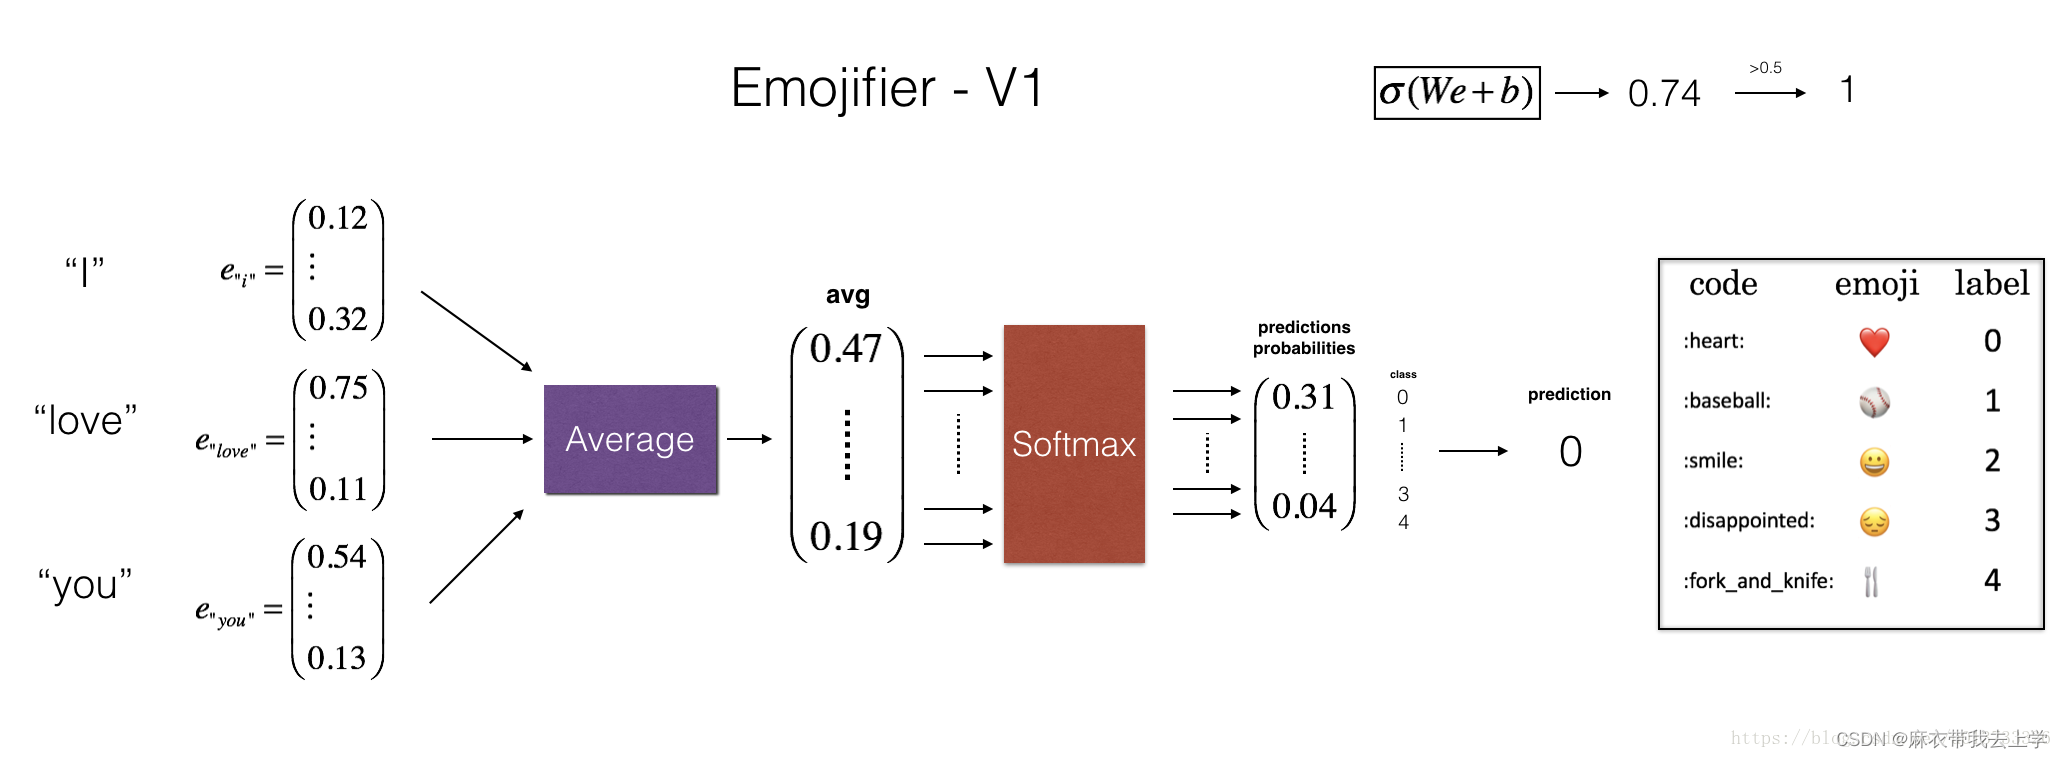
我们首先使用一个简单的前馈神经网络来完成这个分类任务,网络的结构如下:

1.将英文句子进行分词
2.将每个词转换成50维的glove向量,计算得到平均值,作为神经网络的输入
3.经过一层全连接层后,进行softmax操作,得到预测的分类结果
主控模型:
def model(X, Y, word_to_vec_map, learning_rate=0.01, num_iterations=400):
    np.random.seed(1)

    m = Y.shape[0]
    n_y = 5
    n_h = 50

    W = np.random.randn(n_y, n_h) / np.sqrt(n_h)
    b = np.zeros((n_y,))

    Y_oh = emo_utils.convert_to_one_hot(Y, C=n_y)

    for epoch in range(num_iterations):
        for i in range(m):
            avg = sentence_to_avg(X[i], word_to_vec_map)

            # 前向传播
            z = np.dot(W, avg) + b
            a = emo_utils.softmax(z)

            # 计算第i个训练的损失
            cost = -np.sum(Y_oh[i] * np.log(a))

            # 计算梯度
            dz = a - Y_oh[i]
            dW = np.dot(dz.reshape(n_y, 1), avg.reshape(1, n_h))
            db = dz

            # 更新参数
            W = W - learning_rate * dW
            b = b - learning_rate * db
        if epoch % 100 == 0:
            print("第{epoch}轮,损失为{cost}".format(epoch=epoch, cost=cost))
            pred = emo_utils.predict(X, Y, W, b, word_to_vec_map)
    return pred, W, b
计算平均词向量:
def sentence_to_avg(sentence, word_to_vec_map):
    """
    将句子转换为单词列表,提取Glove向量,取平均值
    :param sentence: 输入的句子
    :param word_to_vec_map: 词典
    :return:
    """
    # 将句子拆成单词列表
    words = sentence.lower().split()

    # 初始化均值向量
    avg = np.zeros(50, )

    for w in words:
        avg = avg + word_to_vec_map[w]
    avg = np.divide(avg, len(words))
    return avg
训练测试模型:
words, word_to_vec_map = w2v_utils_pytorch.read_glove_vecs('data/glove.6B.50d.txt')
pred, W, b = model(X_train, Y_train, word_to_vec_map)
print("=====训练集====")
pred_train = emo_utils.predict(X_train, Y_train, W, b, word_to_vec_map)
print("=====测试集====")
pred_test = emo_utils.predict(X_test, Y_test, W, b, word_to_vec_map)
X_my_sentences = np.array(
        ["i adore you", "i love you", "funny lol", "lets play with a ball", "food is ready", "you are not happy"])
Y_my_labels = np.array([[0], [0], [2], [1], [4], [3]])

pred = emo_utils.predict(X_my_sentences, Y_my_labels, W, b, word_to_vec_map)
emo_utils.print_predictions(X_my_sentences, pred)
训练结果如下:
第0轮,损失为1.952049881281007
Accuracy: 0.3484848484848485
第100轮,损失为0.07971818726014794
Accuracy: 0.9318181818181818
第200轮,损失为0.04456369243681379
Accuracy: 0.9545454545454546
第300轮,损失为0.03432267378786059
Accuracy: 0.9696969696969697
=====训练集====
Accuracy: 0.9772727272727273
=====测试集====
Accuracy: 0.8571428571428571

i adore you ❤️
i love you ❤️
funny lol 😄
lets play with a ball ⚾
可以看出经过单层的全连接层训练就可以得到不错的结果,但是存在一些问题。由于模型的输入只是简单地将每个词的词向量做了一个平均,没有考虑到顺序对句子的影响,会得到一些完全错误的结果:
you are not happy ❤️三、表情生成器V2

在表情生成器V2中,我们用两层的LSTM来完成同样的情感分类任务。
1.构造嵌入层embedding_layer
构造嵌入层的目的是能够快速地将英文句子转换成词向量矩阵,首先是读取glove词向量数据文件:
def read_glove_vecs(glove_file):
    with open(glove_file, 'r', encoding='utf8') as f:
        words = set()
        word_to_vec_map = {}
        for line in f:
            line = line.strip().split()
            curr_word = line[0]
            words.add(curr_word)
            word_to_vec_map[curr_word] = np.array(line[1:], dtype=np.float64)

        i = 1
        words_to_index = {}
        index_to_words = {}
        for w in sorted(words):
            words_to_index[w] = i
            index_to_words[i] = w
            i = i + 1
    return words_to_index, index_to_words, word_to_vec_map
words_to_index:字典类型,完成单词到序号的一个映射
index_to_words:字典类型,完成序号到单词的一个映射
word_to_vec_map:字典类型,完成单词到词向量的一个映射这里我们主要用到的是words_to_index,word_to_vec_map。我们通过words_to_index和word_to_vec_map构造嵌入层:
def pretrained_embedding_layer(word_to_vec_map, word_to_index):
    """
    创建embedding层,加载50维的GloVe向量
    :param word_to_vec_map:
    :param word_to_index:
    :return:
    """
    vocab_len = len(word_to_index) + 1
    embedding_size = word_to_vec_map["cucumber"].shape[0]

    # 初始化嵌入矩阵
    embedding_matrix = np.zeros((vocab_len, embedding_size))
    for word, index in word_to_index.items():
        embedding_matrix[index, :] = word_to_vec_map[word]

    embedding_matrix = torch.Tensor(embedding_matrix)

    # 定义embedding层
    embedding_layer = torch.nn.Embedding.from_pretrained(embedding_matrix)
    return embedding_layer
pytorch提供了封装好的嵌入层,只要将嵌入矩阵embedding_matrix传入即可。从代码可以看出embedding_matrix的维度为(单词数,词向量维度),我们将句子拆分成单词,将单词转换成对应序号,即可通过嵌入层找到句子中各个词的词向量:
words_to_index, index_to_words, word_to_vec_map = emo_utils.read_glove_vecs('data/glove.6B.50d.txt')
embedding = pretrained_embedding_layer(word_to_vec_map, words_to_index)
sentence = "i love you"
words = sentence.split()
words_index = [words_to_index[word] for word in words]
words_index = torch.LongTensor(words_index)
words_vec = embedding(words_index)
words_vec2 = [word_to_vec_map[word] for word in words]
tensor([[ 1.1891e-01, 1.5255e-01,...... 9.2121e-01],
[-1.3886e-01, 1.1401e+00,......, 2.8980e-01],
[-1.0919e-03, 3.3324e-01, ......, 1.1316e+00]])
[array([ 1.1891e-01, 1.5255e-01,......, 9.2121e-01]),
array([-0.13886 , 1.1401 , ..... 0.2898 ]),
array([-1.0919e-03, 3.3324e-01, ......, 1.1316e+00])]可以看到,通过嵌入层去得到句子中每个词的词向量和直接得到词向量的结果是一样的,不同的是嵌入层得到的是tensor类型的数据。
2.Dataloader
当完成嵌入层后,我们可以根据训练数据封装Dataloader:
class Sentence_Data(Dataset):
    def __init__(self, filename):
        super(Sentence_Data, self).__init__()
        self.max_len = 20
        data, label = emo_utils.read_csv(filename)
        self.label = torch.from_numpy(label)

        self.len = self.label.size()[0]

        words_to_index, index_to_words, word_to_vec_map = emo_utils.read_glove_vecs('data/glove.6B.50d.txt')
        self.embedding = self.pretrained_embedding_layer(word_to_vec_map, words_to_index)
        self.data = self.sentence_to_vec(data, words_to_index=words_to_index)

    def __getitem__(self, item):
        return self.data[item], self.label[item]

    def __len__(self):
        return self.len

    def pretrained_embedding_layer(self, word_to_vec_map, word_to_index):
        """
        创建embedding层,加载50维的GloVe向量
        :param word_to_vec_map:
        :param word_to_index:
        :return:
        """
        vocab_len = len(word_to_index) + 1
        embedding_size = word_to_vec_map["cucumber"].shape[0]

        # 初始化嵌入矩阵
        embedding_matrix = np.zeros((vocab_len, embedding_size))
        for word, index in word_to_index.items():
            embedding_matrix[index, :] = word_to_vec_map[word]

        embedding_matrix = torch.Tensor(embedding_matrix)

        # 定义embedding层
        embedding_layer = torch.nn.Embedding.from_pretrained(embedding_matrix)
        return embedding_layer

    def sentence_to_vec(self, data, words_to_index):
        vec_list = []
        for sentence in data:
            words_index = self.sentences_to_indices(sentence, words_to_index, self.max_len)
            words_index = torch.LongTensor(words_index)
            words_vec = self.embedding(words_index)
            vec_list.append(words_vec)
        return vec_list

    def sentences_to_indices(self, x, words_to_index, max_len):
        """
        输入的是X(字符串句子列表),再转化为对应的句子列表
        :param x: 句子数组,维度为(m,1)
        :param word_to_index: 字典类型,单词到索引的映射
        :param max_len: 最大句长
        :return:
        """
        X_indices = np.zeros(max_len)

        sentences_words = x.lower().split()

        j = 0

        for w in sentences_words:
            X_indices[j] = words_to_index[w]

            j += 1
        return X_indices
在读取完训练数据后,将每个句子分词并转换成序号列表(sentences_to_indices),根据得到的嵌入层将序号列表转换成向量(sentence_to_vec),这就完成了每个句子向量化。考虑到每个句子的长度不同,我们需要设置最大长度max_len(这里设置的20),若句子长度不足最大长度就用0向量来填充。所以每个句子都会得到一个(20,50)的矩阵,20表示的是最大句长,50表示的是词向量的维度。
3.构造LSTM
import torch
class LSTM_EMO(torch.nn.Module):
    def __init__(self, input_size, num_classes):
        super(LSTM_EMO, self).__init__()
        self.lstm = torch.nn.LSTM(input_size=input_size, hidden_size=128, num_layers=2, dropout=0.5, batch_first=True)
        self.dropout = torch.nn.Dropout(0.5)
        self.fc = torch.nn.Linear(128, num_classes)
        self.softmax = torch.nn.Softmax(dim=1)

    def forward(self, x):
        out, (h_n, c_n) = self.lstm(x)
        out = self.dropout(h_n[-1])
        linear_out = self.fc(out)
        return linear_out

    def predict(self, x):
        out, (h_n, c_n) = self.lstm(x)
        out = self.dropout(h_n[-1])
        linear_out = self.fc(out)
        y_pre = self.softmax(linear_out)
        return y_pre
根据神经网络结构图,我们需要搭建两层的LSTM,取最后一层的最后输出向量作为全连接层的输入。
self.lstm = torch.nn.LSTM(input_size=input_size, hidden_size=128, num_layers=2, dropout=0.5, batch_first=True)inputsize:每个时刻输入的维度,根据glove提供的词向量,inputsize应该为50
hidden_size:LSTM单元的隐藏层大小
num_layers:LSTM的层数,这里设置了两层LSTM
dropout:为不同层之间设置dropout
batch_first:与输入数据的维度格式有关,
当batch_first为True时输入的维度为(batch_size,句长,词向量维度);
当batch_first为False时,输入的维度为(句长,batch_size,词向量维度)。关于torch.nn.LSTM的输出包含两个部分output和(h_n, c_n):
output:每个时刻的输出构成的矩阵,维度应为(批处理大小,句长,LSTM单元输出维度)
h_n:最后时刻隐藏层的输出h,维度应为(LSTM层数,批处理大小,LSTM单元输出维度)
c_n:最后时刻LSTM单元的c,维度应为(LSTM层数,批处理大小,LSTM单元输出维度)
我们应该取第二层LSTM的输出作为全连接层的输入,即h_n[-1]。
4.模型训练
if __name__ == "__main__":
    # 初始化训练参数
    batch_size = 32
    epoch_nums = 1000
    learning_rate = 0.001
    costs = []
    input_size = 50
    num_classes = 5
    # 加载训练数据
    train_data = Sentence_Data(train_data_path)
    train_data_loader = DataLoader(train_data, shuffle=True, batch_size=32)

    # 初始化模型
    m = lstm_pytorch.LSTM_EMO(input_size=input_size, num_classes=num_classes)
    m.to(device)

    # 定义优化器和损失函数
    loss_fn = torch.nn.CrossEntropyLoss().to(device)
    optimizer = torch.optim.Adam(m.parameters(), lr=learning_rate)

    # 开始训练
    print("learning_rate=" + str(learning_rate))
    for epoch in range(epoch_nums):
        cost = 0
        index = 0
        for data, label in train_data_loader:
            data, label = data.to(device), label.to(device)

            optimizer.zero_grad()

            y_pred = m.forward(data)

            loss = loss_fn(y_pred, label.long())
            loss.backward()

            optimizer.step()

            cost = cost + loss.cpu().detach().numpy()
            index = index + 1
        if epoch % 50 == 0:
            costs.append(cost / index)
            print("epoch=" + str(epoch) + ":  " + "loss=" + str(cost / (index + 1)))
模型训练一般步骤:设置训练超参数->加载数据集->初始化模型->定义优化器和损失函数->开始训练。
5.实验结果
用pytorch复现时测试集上的准确率并未达到原博客中的那么高,具体原因还在研究中:
    epoch=700:  loss=0.0019042102503590286
    epoch=750:  loss=0.0015947955350081127
    epoch=800:  loss=0.0009102935218834318
    epoch=850:  loss=0.0009600761889790496
    epoch=900:  loss=0.0004162280577778195
    epoch=950:  loss=0.0004672826180467382
    训练集上准确率为:1.0
    测试集上准确率为:0.83928573
